The program interface is divided into 4 main sections:
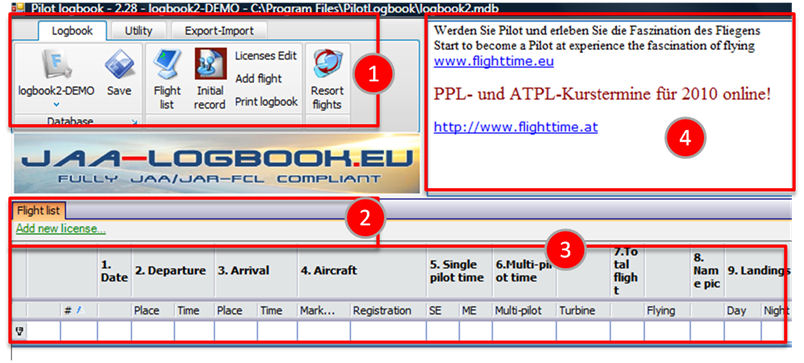
Section 1 Menu: contains the menu with all functions and tools
Section 2 Licenses: displays all entered licenses including their expiration date. If you approach any expiration date the corresponding entry will turn red and start flashing to remind you to renew your license in-time.
Section 3 Flights: contains the flight list and allows for easy filtering.
Section 4 Ads: Contains current advertisements (to allow us to continue to provide this application totally cost-free)
After you finish installation you have to enter the initial record with your basic data by pressing on the flashing “Initial record” button in the Menu: Section 1 Menu: contains the menu with all functions and tools
Please fill in your personal data and any previous block and flight times you want to transfer from your previous logbook.
Entry “Use aircraft take-off/landing Yes/No” option allows you to enter your actual flight (take-off and landing time) in addition to block-on and block-off times.
In the lower part of the Initial Setup screen you can define custom columns for tracking specific flight conditions (e.g. flight times for specific aircrafts, flight times for specific condition like ‚private flight‘, ‚commercial flight time‘, ‚line flight time‘, ‚JAR FI flight time‘, „FAA FI flight time‘, …).

![]()
Simply click on „Add new“ and define the name and the initial/starting hours for your new columns. The columns will added to the very right part of your logbook (after the official and mandatory logbook columns). The order of those columns can be sorted with the small red/green arrows. This new columns can be printed if marked on the Flighlog Print screen (see 8 – Printing options below).
When all flight time entries are complete please continue to the license setup by pressing the “Edit licenses” button in the lower part of the screen or via the upper menu bar.

When you open the license editor there is already an entry “1. Medical” included. By pressing the small edit icon you can change the license name and license expiration date in the lower part of the screen.

If you want to enter additional license, category or rating expiration dates (e.g. PPL, CPL, ATPL, SE-IR, ME-IR, TypeRatings, English language proficiency) you can enter them in part 2 of the screen and press save. All additional entries will be moved to the license list.
You can exit this screen by pressing “Close” in the lower part of the windows.
After you have finished the Initial and License Setup you are ready to start entering your flights.
Before you enter your first flight by pressing the “Add flight” button (No. 1 shown below), please note that your previous flight data entered in the initial setup is shown as the first entry in the flight list (No. 2, shown below).

Upon pressing the “Add flight” button the “New Flight” window opens. The basic structure follows the contents of a conventional paper-based logbook.

In area 1 you have to choose whether you want to enter a “Flight” or a “Synthetic training device”/FTD/Simulator training session. If you choose “Flight” all fields in areas 2 – 6 are activated, if you choose “Synthetic training devices session” all fields in area 7 are activated. For time-saving there is also a “Copy from last flight” function available, that copies basic data from you last flight and reduces entry effort.
In area 2 you have to enter date of flight, departure, destination (a pop-up with the current IATA and ICAO airport designator will assist you in selecting the correct airport), block-off, block-on and (only if enabled in the initial record) aircraft departure and aircraft landing times. Block- and flight times will be calculated automatically. A/C Registration and type and day/night landing information is also mandatory. Auto-complete functionality will assist you and speed up data entry.
Area 3 allows for entry of other crew members and any remarks you want to include for this flight.
Area 4 allows the specification of single/multi-engine including multi-pilot aircraft. The following abbreviations are used to correctly document your aircraft category and class and duty function fully conforming to JAR-FCL requirements:
SPA SE: Single Pilot Aeroplane – Single Engine. This includes all single engine piston aircraft like Cessna 172, Piper 28, Diamond DA20/DA40 and similar types that are certified for single pilot operations with one engine. Please not that also single engine turbine aircraft certified as SPA should be entered as „SPA SE“ – we have the checkbox „turbine“ included for differentiation.
SPA ME: Single Pilot Aeroplane – Multi Engine. This includes all multi engine piston aircraft like PA34 Seneca, DA42 TwinStar and and similar types that are certified for single pilot operations with multiple engines. Please not that also multi engine turbine aircraft certified as SPA (e.g. Cessna CitationJet/C525 Series) should be entered as „SPA ME“ – we have the checkbox „turbine“ included for differentiation.
MPA: Multi Pilot Aeroplane – This definition is based on the certification of the airplane and not related to your single pilot or multi pilot operations. All aircraft that require 2 pilots as minimum crew are certified as MPA. (e.g. Citation XLS and above series, all airliners etc.)
Commercial Operations Options:
PF SPA ME & MPO: Pilot Flying Single Pilot Aeroplane & Multi Pilot Operations. This selection is intended for aircraft certified as single pilot aircraft (SPA) but operated in a multi crew environment (e.g. commercial operations like charter, air transport etc.). The pilot flying this leg should select this option. The selection for „SPA ME“ will automatically be added.
PNF SPA ME & MPO: Pilot Non-Flying Single Pilot Aeroplane & Multi Pilot Operations. This selection is intended for aircraft certified as single pilot aircraft (SPA) but operated in a multi crew environment (e.g. commercial operations like charter, air transport etc.). The pilot *non* flying this leg should select this option. The selection for „SPA ME“ will automatically be added.
You can select “turbine” if you want to mark all turbine flights separately.
If you are operating in Multi engine & multi pilot environments it is possible to enter flights with „0“ landings if the pilot function is not „Pilot in Command“ (PIC). This option is being used in multi pilot environments, where only the PIC is allowed to log landings.
Area 5 is for documenting the operating environment. If you want to calculate night flighttime based on our global location and sunrise/sunset database you can press the small calculator symbol. You can also enter night flighttime manually.
Area 6 contains PIC, Co-Pilot and Dual-training flight times. Please note that according to current interpretation of the regulations you can not log PIC times on dual/training flights. If you have performed the duties of a Flight Instructor you can mark this flight with the “Instructor” checkbox.
Once you are finished with the entry press the “Apply” button and you are back to the start screen. Your flight will be shown as the last entry.
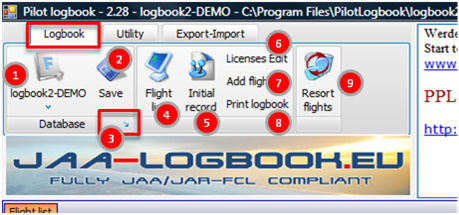
The Logbook menu bar contains most functions of this application.
Button 1 allows the selection of different logbooks (e.g. different logs for Airplane/Helicopter/Parachute/Glider/Simulator). If you want to keep all flights in one logbook you do not need this functionality.
Button 2 saves the entire logbook to a destination of your choice as MS-Access/MDB database file. Please note that in order to ensure full JAA-compliance it is not possible to open this file directly with MS-Access. Use this function for creating regular backups of your logbook.
Button 3 allows you to manage all available logbooks shown when pressing button 1. If you want to keep all flights in one logbook you do not need this functionality.
Button 4 brings you back to the initial flight list window from within any menu.
Button 5 opens the “Initial record” created during initial setup. Use this function if you want to change your E-Mail address or any comments.
Button 6 opens the “License-editor”. Use this function to update, remove or add your license-expiration dates. Please note that if you approach the license-expiration date of any of your licenses the entry will start flashing to alert you to renew your licenses in-time.
Button 7 opens the “New Flight” window.
Button 8 opens the printing view. See section “Printing Options” for detailed explanation.
Button 9 resorts all entered flights. Use this function only if you forget to enter flights in the past and still want to ensure subsequent flight numbers when you sort your flights by date.
 The utility menu has been included based on user-feedback. Button 1 checks for data consistency of aircraft types. All flights entered as Single-Engine and Mulit-Pilot are scanned.
Button 2 automatically corrects all entries found with Button 1.
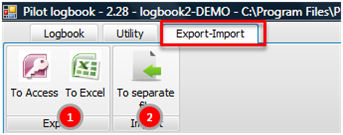 The Export-Import menu allows export your flight data to MS-Access or MS-Excel files (Button 1) that might be used for personal record-keeping or analysis. Button 2 allows direct import of flight data from other Pilot logbook users.
This pilot logbook includes many powerful printing features that will meet both your personal preferences and the requirements of the authorities.

The print view can be accessed with the “Print logbook” button from the menu.
The print view is divided in an upper part containing filter options and lower part containing filter results:

Area 1 contains all available filter options. If you select any or a combination of different criteria and press button 6 “Apply Filter” only the corresponding flights will be shown in the lower results part of the screen.
Area 2 allows to select sort order of the printouts. Button 3 allows to print the logbook in a regular logbook format („Print logbook for Authority“ or as a very detailled change log („Print log for logbook“).
Area 4 allows forther customizing of the printout: You can change the background color of the column header (default is light grey), you can change the color of even and odd-rows and you can change the number of rows included on a single page. This is useful if you want to synchronize the layout of your printout with any paper logbook you are still using. You can also select ALL available default and custom added extra columns (defined in the Menu: Initial Setup) that shall be included in the printout.
Button 5 allows to show or hide the filter options in area 1. Use this function if you want to expand the results pane to preview printing results.
Buttons in area 6 apply and clear filter and allow exporting of filtered results to a PDF or a MS-Excel list.
Buttons in area 7 allow to manipulate (zoom, rotate, flip pages) filter results in the lower part of the screen. One very handy feature ist the „Scale“ option (7th icon from left), that allows scaling your printout to specific page sizes (very useful if you want to print extra columns on the same page as the other logbook columns).